19 Git and GitHub
Here we provide a brief introduction Git and GitHub. We are only scratching the surface. To learn more about Git, we highly recommend the following resources:
If you plan to use Git and Github frequently in conjunction with R, we highly recommend reading Happy Git and GitHub for the useR3 to learn about the details we don’t cover here.
19.1 Why use Git and GitHub?
Three primary reasons to use Git and GitHub are:
Version Control: Git allows you to track changes in your code, revert to previous file versions, and work on multiple branches simultaneously. Once changes are finalized, different branches can be merged.
Collaboration: GitHub offers a central storage solution for projects and lets you add collaborators. These collaborators can make changes, keeping all versions synchronized. Moreover, the pull request feature on GitHub enables others to suggest modifications to your code, which you can then approve or reject.
Sharing: Beyond its powerful version control and collaboration tools, Git and GitHub serve as a platform to easily share your code with others.
We primarily emphasize the sharing capabilities here. For a deeper dive into its other functionality, please refer to the provided resources above. One major advantage of hosting code on GitHub is the ease with which you can showcase it to potential employers seeking samples of your work. Given that numerous companies and organizations employ version control systems like Git for project collaboration, they may find it commendable that you possess some knowledge of the tool.
19.2 Overview of Git
To effectively permit version control and collaboration with Git we need to understand the concept of a repository, often simply called a repo. A repo is a digital storage space where you can save, edit, and track versions of files for a specific project. Think of it as a project folder combined with a detailed logbook. It holds all the files and directories related to the project and also records of every change made, who made it, and when. This allows multiple people to collaborate on a project without overwriting contributions from others. You can also easily revert to previous versions if needed.
Note that Git permits the creation of different branches within a repository. This permits working on files in parallel which is particularly useful for testing ideas that involve big changes before incorporating with a stable version. In this book we provide only examples with just one branch. To learn more about how to define and use multiple branches please consult the resources provided above.
A common practice involves hosting central main branch on a GitHub repository that all collaborators can access remotely. The main branch is considered the stable official version. Each collaborator also maintains a local repository on their computer, allowing them to edit and test changes before committing them to the main repository.
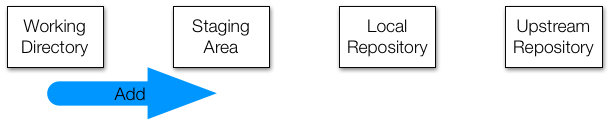
We’re going to explore how Git works by following these step:
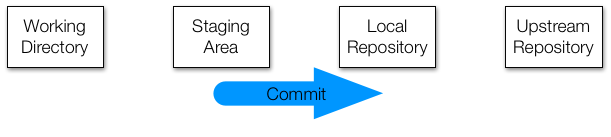
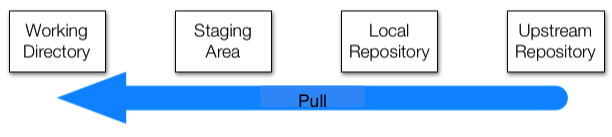
1. First, you’ll learn how to make changes on your computer in what’s called the working directory.
2. Once you’re happy with your changes, you’ll move them to the staging area. Think of this as preparing or packing your changes.
3. From there, you’ll save these changes to your local repo, this is like your personal save point on your computer and will generate a new version of the repository in the log.
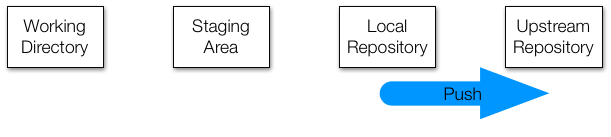
4. After saving locally, you’ll then send, or push, these changes to the main storage space where everyone can see them. In our examples, this main storage space is hosted on GitHub, and Git calls it the upstream repo.

Now, to work with this strategy, you’ll need an account on GitHub. In the next two sections, we’ll guide you on how to set up an account and create repos on GitHub.
19.3 GitHub accounts
Basic GitHub accounts are free. To create one, go to GitHub4 where you will see a box in which you can sign up.
You want to pick a name carefully. It should be short, easy to remember and to spell, somehow related to your name, and professional. This last one is important since you might be sending potential employers a link to your GitHub account. Your initials and last name are usually a good choice.
19.4 GitHub repositories
Once you have an account, you are now ready to create a GitHub repository that will serve as the main or upstream repo for a project. Collaborators you add to this project will be able to manage a local repository on their computer and push changes. Git will help you keep all the different copies synced.
To create a repo, first log in to your account by clicking the Sign In button on GitHub. You might already be signed in, in which case the Sign In button will not show up. If signing in, you will have to enter your username and password. We recommend you set up your browser to remember this to avoid typing it in each time.
Once on your account, you can click on Repositories and then click on New to create a new repo. You will be prompted for a name:
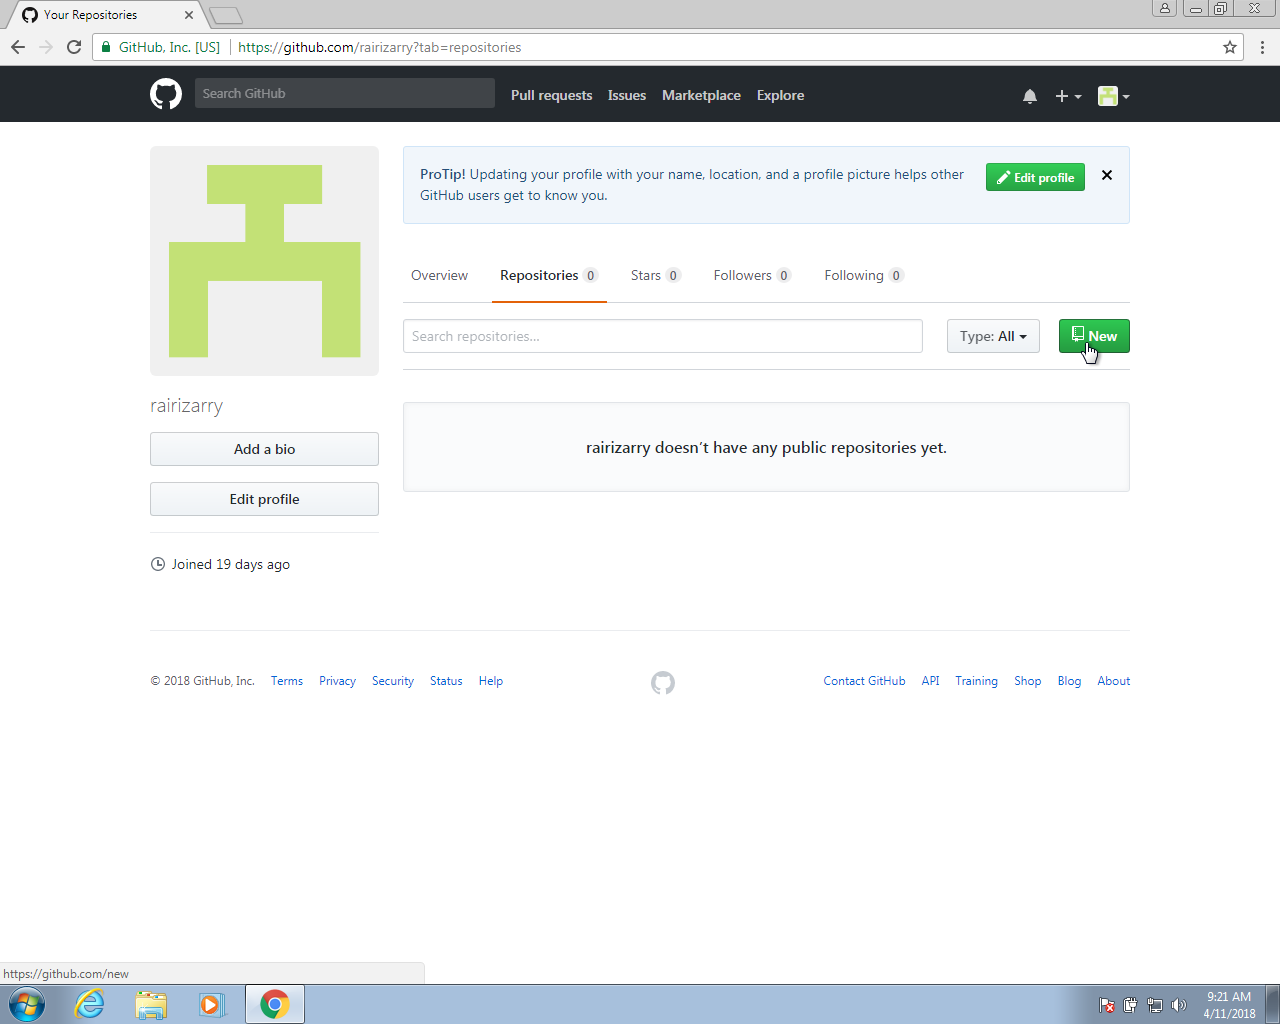
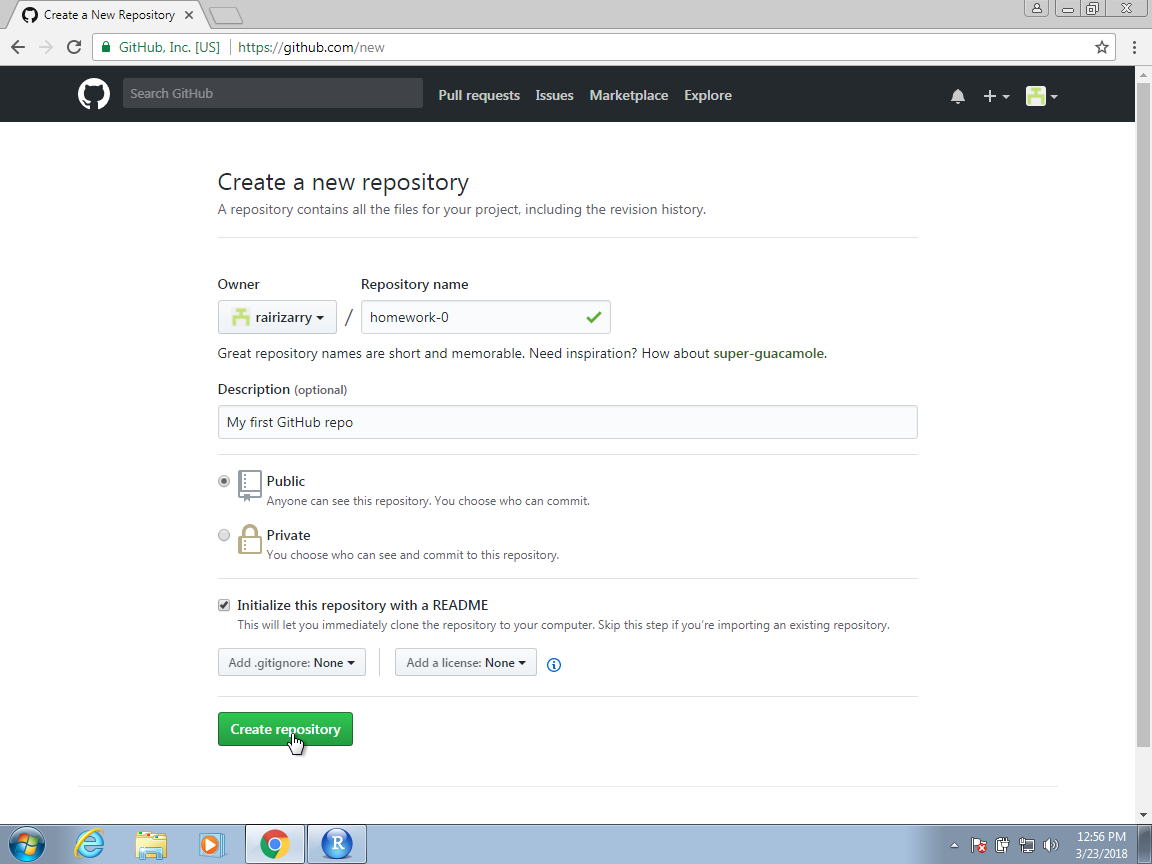
When naming your project, pick a descriptive name that clearly tells what the project is about. Keep in mind that as you work on more projects, you’ll accumulate many repositories. As an illustration, we will use the name homework-0.
You will also be prompted to decide whether your repo should be public or private. To decide, know that this is the difference:
Public repositories: Anyone on the internet can see these. Only collaborators can make changes.
Private repositories: Only people you grant access to can view them.
While there are other settings to consider, we typically stick with the default options provided by GitHub.
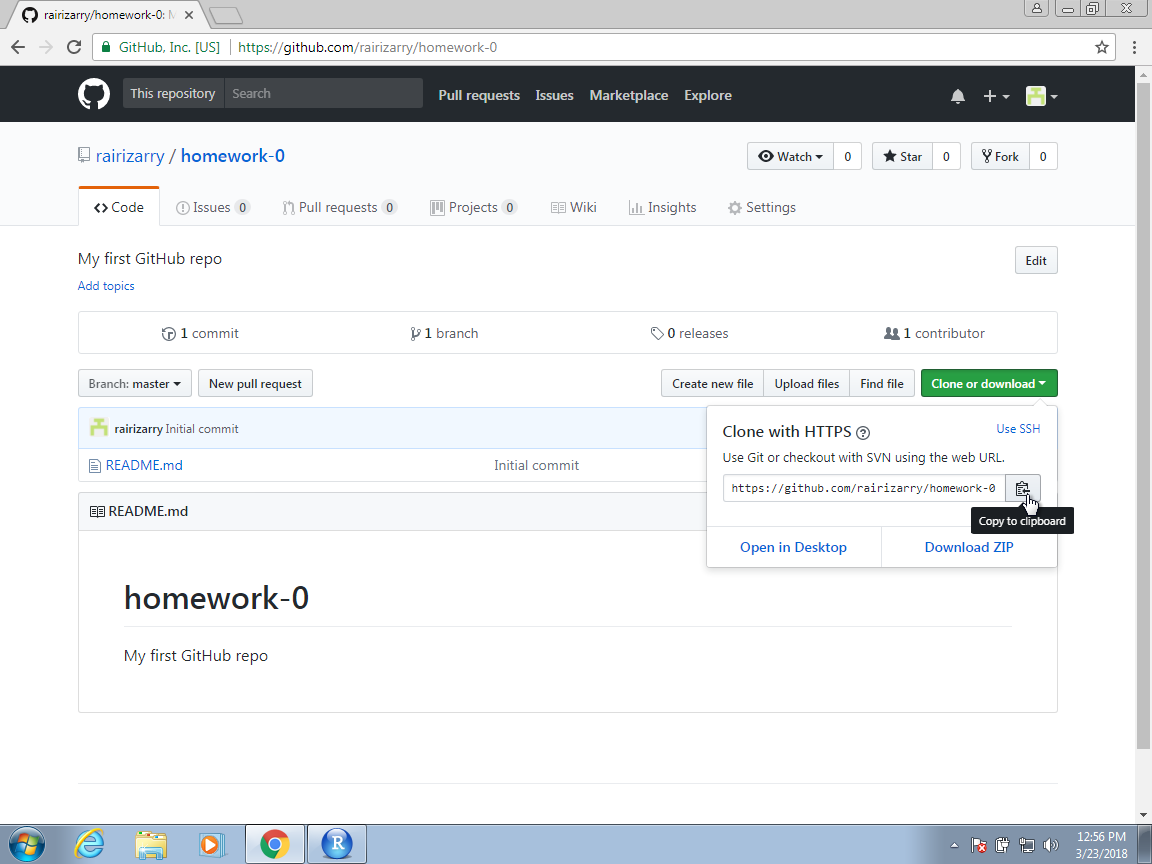
After creating your repo, GitHub will show you steps to link your local repo (the one on your computer) to the new one you’ve set up on GitHub. They’ll provide some code that you can directly copy and paste into your terminal. We will break down that code so you’ll know exactly what each command does.
19.5 Connecting Git and GitHub
When accessing GitHub you need credentials to verify your identity. There are two ways to connect: HTTPS or SSH, each requiring different credentials. We recommend using HTTPS, which uses a Personal Access Token (PAT). Note that your GitHub website password isn’t your access token.
GitHub provides a detailed guide on obtaining an access token5 which can be found by searching “Managing your personal access tokens” on the GitHub Docs website6. To generate a token:
- Carefully follow the instructions provided by GitHub.
- When setting permissions for the token, choose non-expiring and select the repo option in the scopes section.
Once you complete these steps, GitHub will display your token—a lengthy string of characters. You should then:
- Immediately copy this token to your clipboard. Remember, this is the only time GitHub will show it to you.
- For security, save this token in a password manager. This ensures you can access it if needed later on.
In some of the procedures outlined below, you’ll be prompted to enter your password. Instead, paste the token you’ve copied. After this, password prompts should no longer appear. If you ever need the token again, retrieve it from your password manager.
For a much more detailed explanation, including how to use SSH instead of HTTPS, please consult Happy Git and GitHub for the useR7.
The next step is to let Git know who we are. This will make it easier to connect with GitHub. To to this type the following two commands in our terminal window:
git config --global user.name "Your Name"
git config --global user.mail "your@email.com"
This will change the Git configuration in way that anytime you use Git, it will know this information. Note that you need to use the email account that you used to open your GitHub account.
19.6 Initial setup
In a terminal, move to the directory you want to store the local repository. We recommend naming the directory the same as the GitHub repo. In our example we would use:
mkdir homework-0
cd homework-0
We then initialize the directory as a Git repository, starting the version control process.
git initGitHub now uses main as the default branch name. In the past, both Git and GitHub used master as the default. As a result, many older repositories or older versions of Git might still use master as their primary branch.
To ensure your local branch aligns with the GitHub repository’s branch name:
- Visit the GitHub repository page.
- Check the dropdown menu on the left that lists branches. This will display the default branch name.
To verify your local branch name, use:
git branchIf you see a branch name other than main but want it to be main, rename it with:
git branch -M main*The -M stands for move. Note that this is different from changing branches, it is renaming the current branch.
To link your local repository to its counterpart on GitHub, you’ll need the GitHub repository’s URL. To find this, go to the repository’s webpage. Click the green Code button to quickly copy the URL, which in our example is https://github.com/rairizarry/homework-0.git.
Once you have this you can type
git remote add origin https://github.com/rairizarry/homework-0.gitTo understand this command note that git remote add adds a new remote reference. A remote in Git refers to another place where your code repository is stored, usually on the internet or another network. origin is the conventional name given to the remote repository or the central repository that other people will treat as an main project source. It’s essentially a shorthand alias for the repository’s URL. You could technically name it anything you want, but origin is the convention most use. Finally, https://github.com/rairizarry/homework-0.git is the URL of the remote repository. It tells Git where the repository is hosted. Together, these commands set up a new local Git repository and link it to a remote repository on GitHub.
19.7 Git basics
Now that you have initialized a directory to store your local repository, we can learn how to move files from our working directory all the way to the upstream repo.
19.7.1 The working directory

The working directory is the same as your Unix working directory. In our example, if we create a file in the homework-0 directory, it is considered to be in the working directory. Git can tell you how the files in the working directory relate to the versions of the files in other areas with the command
git statusBecause we have not done anything yet, you should receive a message such as
On branch main

No commits yet

nothing to commit (create/copy files and use "git add" to track)
If we add a file, say code.R, you will see a message like:
Untracked files:
  (use "git add <file>..." to include in what will be committed)
    code.R
19.7.2 add
Now we are going to make changes to these files. Eventually, we want these new versions of the files to be tracked and synced with the upstream repo. But we don’t want to keep track of every little change: we don’t want to sync until we are sure these versions are final enough to share as a new version. For this reason, edits in the staging area are not kept by the version control system.
To demonstrate, we add code.R to the staging area:
git add code.RRunning git status now shows
Changes to be committed:
  (use "git rm --cached <file>..." to unstage)
    new file:   code.R
Note that it is not a problem to have other files in the working directory that are not in the staging area. For example, if we create files test-1.R and test-2.R, git status reminds us these are not staged:
On branch main

No commits yet

Changes to be committed:
  (use "git rm --cached <file>..." to unstage)
    new file:   code.R

Untracked files:
  (use "git add <file>..." to include in what will be committed)
    test-1.R
    test-2.R
19.7.3 commit
If we are now ready to make a first version of our repository, which only includes code.R, we can use the following command:
git commit -m "Adding a new file." Note that commit requires us to add a message. Making these informative will help us remember why this change was made. After running commit we will receive a message letting us know it was committed:
[main (root-commit) 1735c25] adding a new file
 1 file changed, 0 insertions(+), 0 deletions(-)
 create mode 100644 code.R
Note that if we edit code.R, it changes only in the working directory. git status shows us
Changes not staged for commit:
 (use "git add <file>..." to update what will be committed)
  (use "git restore <file>..." to discard changes in working directory)
    modified:   code.R
To add the edited file to the local repo, we need to stage the edited file and commit the changes
git add code.R
git commit -m "Added some lines of code."
which gives us a message letting us know a change was made:
[main 8843673] added some lines of code
 1 file changed, 1 insertion(+)
Note that we can achieve the same results with just one line by following the commit command with the files we want committed:
git commit -m "Added some lines of code." code.RThis is convenient when the number of files that change is small and we can list them at the end.
To see version control in action note what happens when we type
git log code.Rwe get a list of the version that have been stored in our log:
commit 88436739dcbd57d8ad27a23663d30fd2c06034ca (HEAD -> main)
Author: Rafael A Irizarry
Date:   Sun Sep 3 15:32:03 2023 -0400

    Added some lines of code.

commit 1735c25c675d23790df1f9cdb3a215a13c8ae5d6
Author: Rafael A Irizarry
Date:   Sun Sep 3 15:27:19 2023 -0400

    Adding a new file.
19.7.4 push
Once we are ready to sync our local repo with the upstream GitHub repo, we can use
git push -u origin mainIf this is your first time pushing to your GitHub account, you will be asked for a password and you have to enter the personal access token we described in Section 19.5. You should only need to do this once.
The -u flag, short for --set-upstream will make Git remember that in this repository you want to push to the main branch in the remote repo origin defined in the initialization. This is beneficial because the next time you want to push or pull from this branch, you can simply use
git pushIf you need a reminder of where you are pushing to you can type
git remote -vThe v stands for verbose. In our example we will get
origin  https://github.com/username/homework-0.git (fetch)
origin  https://github.com/username/homework-0.git (push)
We describe fetch next. If you don’t get anything back it means you have not defined your remote as we did in Section 19.6.
19.7.5 fetch and merge
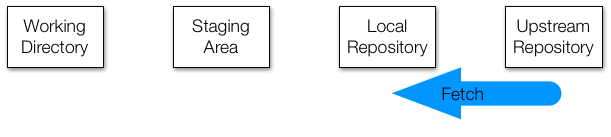
If this is a collaborative project, the upstream repo may change and become different than your version. To update your local repository to be like the upstream repo, we use the command fetch:
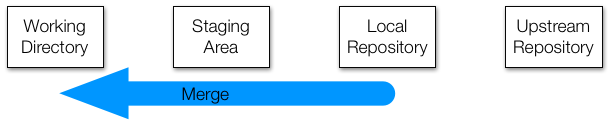
git fetchAnd then to make these copies to our working directory, we use the command:
git merge19.7.6 pull
We very often just want to fetch and merge without checking. For this, we use:
git pull19.7.7 clone
You can easily download all the code and version control logs from an existing public repository using git clone. When you clone you are essentially making a complete copy of the entire directory. For example, you can download all the code used to create this book using:
git clone https://github.com/rafalab/dsbook-part-1.gitYou can see a simple example with the murders directory created in the Unix chapter by cloning this repository:
git clone https://github.com/rairizarry/murders.gitIf you use git clone, you do not need to initialize as the branch and remote will already be defined. Now, to push changes you need to be added as a collaborator. Otherwise you will have to follow the more complex process of a pull request, which we don’t cover here.
19.8 .gitignore
When we use git status we obtain information about all files in our local repo. But we don’t necessarily need to add all the files in our working directory to the Git repo, only the ones we want to keep track of or the ones we want to share. If our work is producing files of a certain type that we do not want to keep track of, we can add the suffix that defines these files to the .gitignore file. More details on using .gitignore are included on the git-scm website8. These files will stop appearing when you type git status.
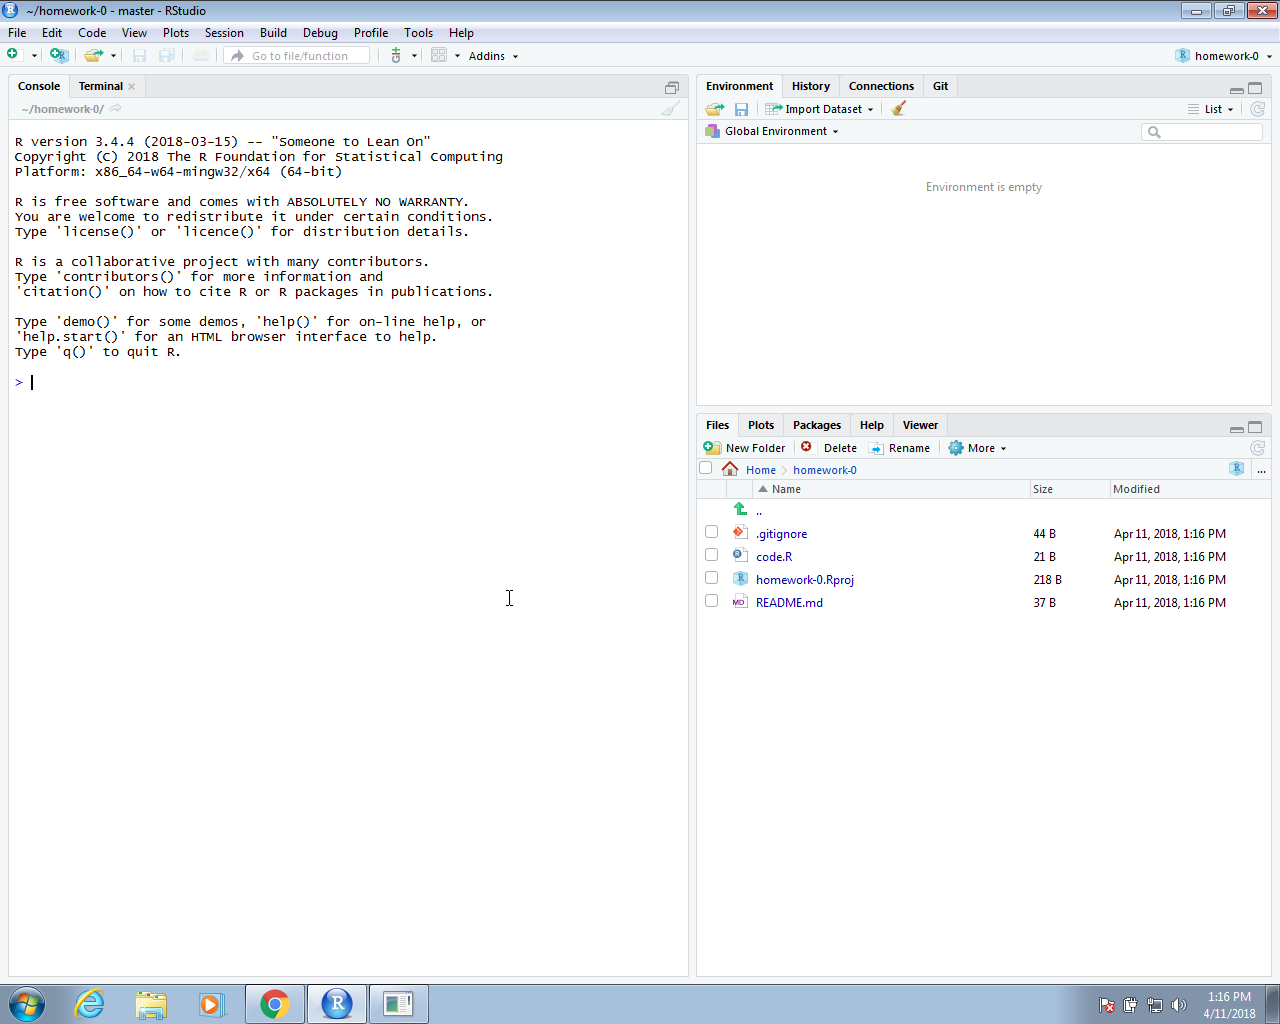
19.9 Git in RStudio
While command line Git is a powerful and flexible tool, it can be somewhat daunting when we are getting started. RStudio provides a graphical interface that facilitates the use of Git in the context of a data analysis project.
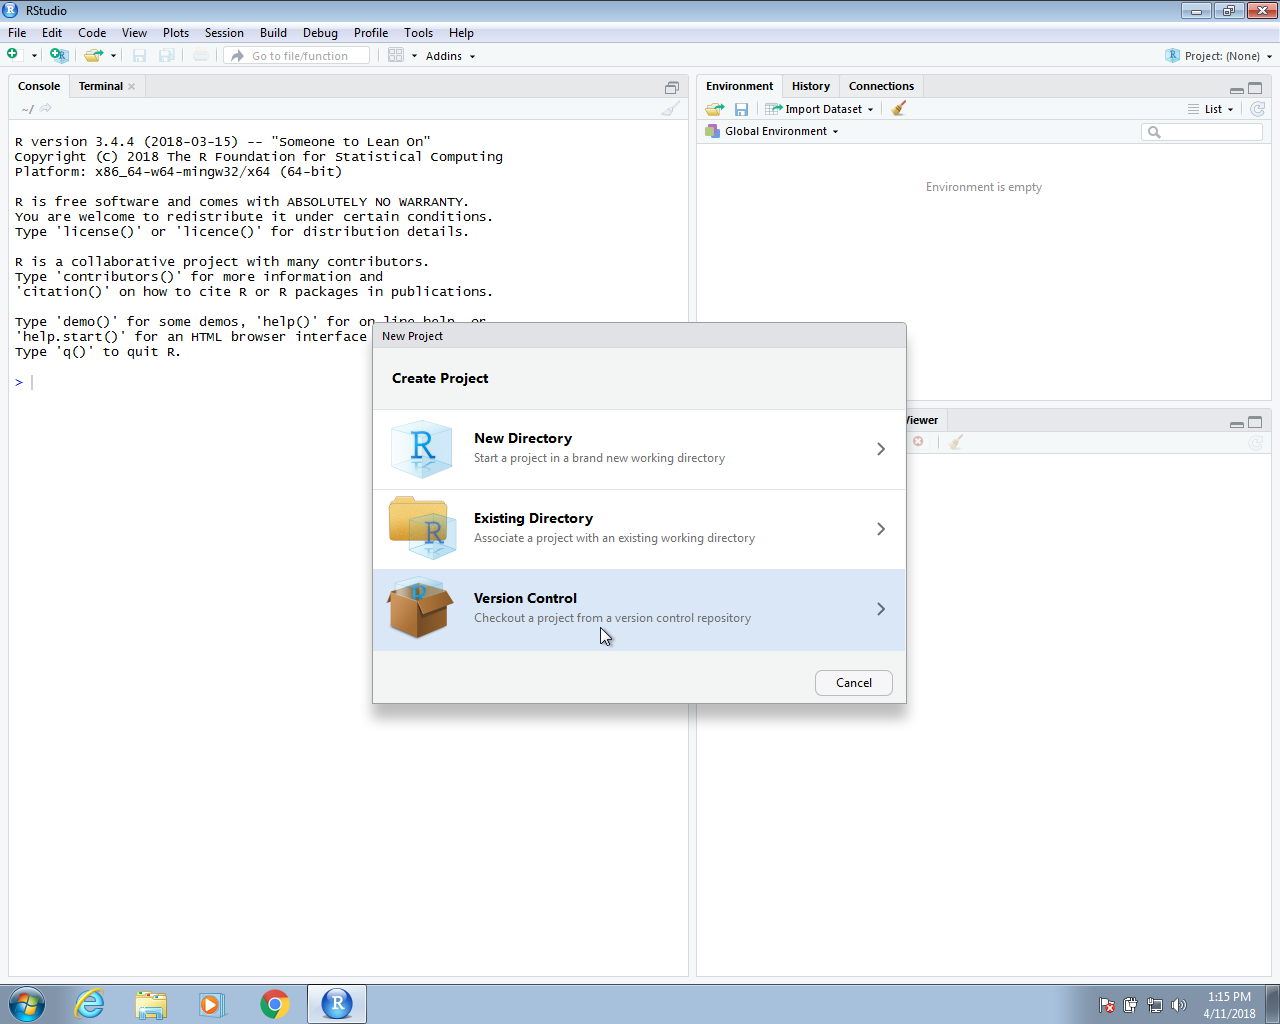
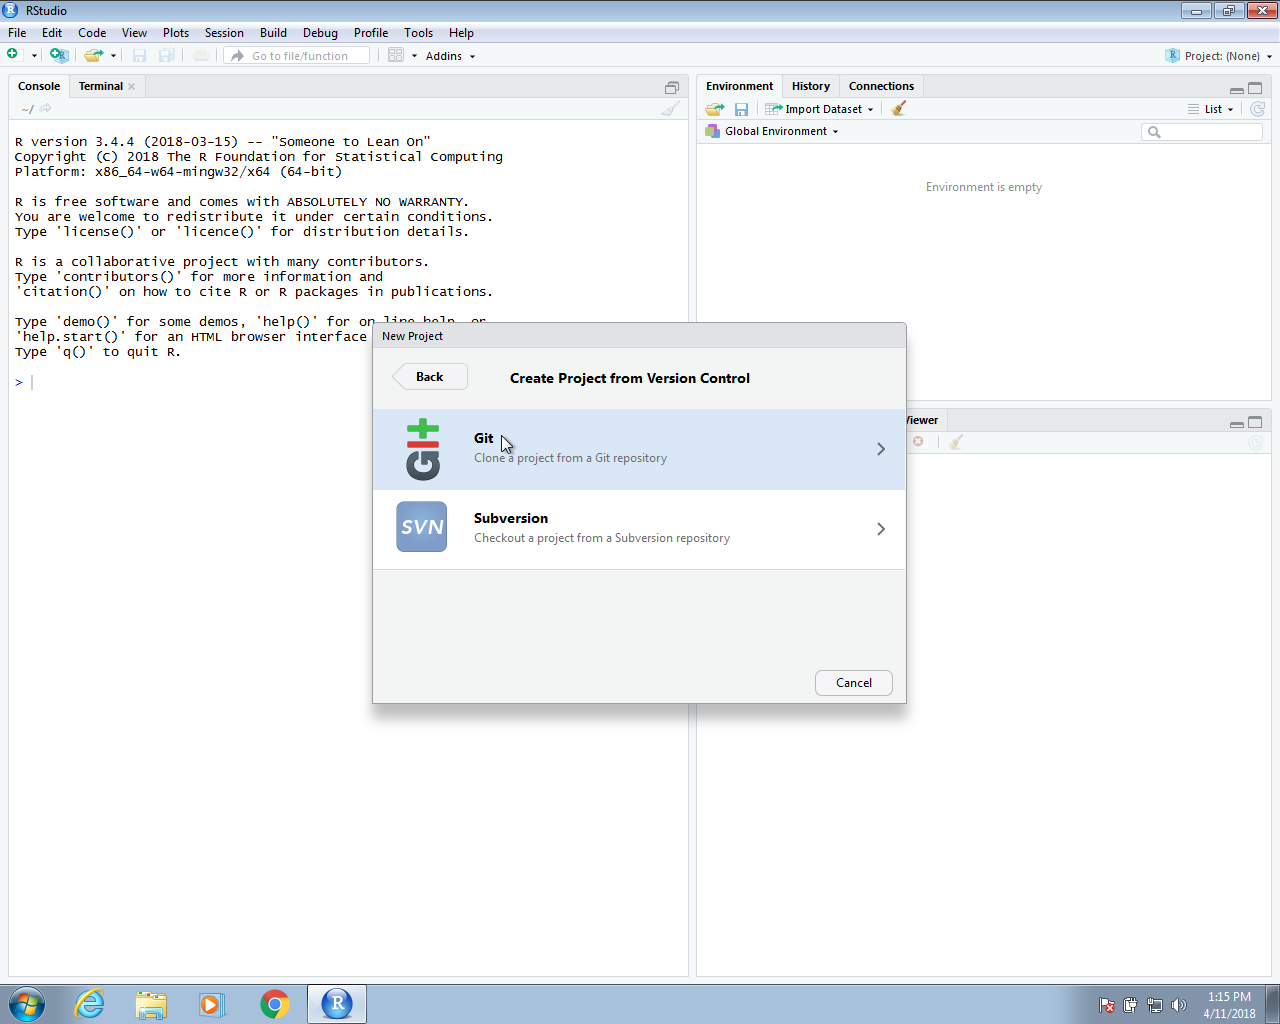
To do this, we start a project but, instead of New Directory, or Existing Directory, we select Version Control and then we will select Git as our version control system:
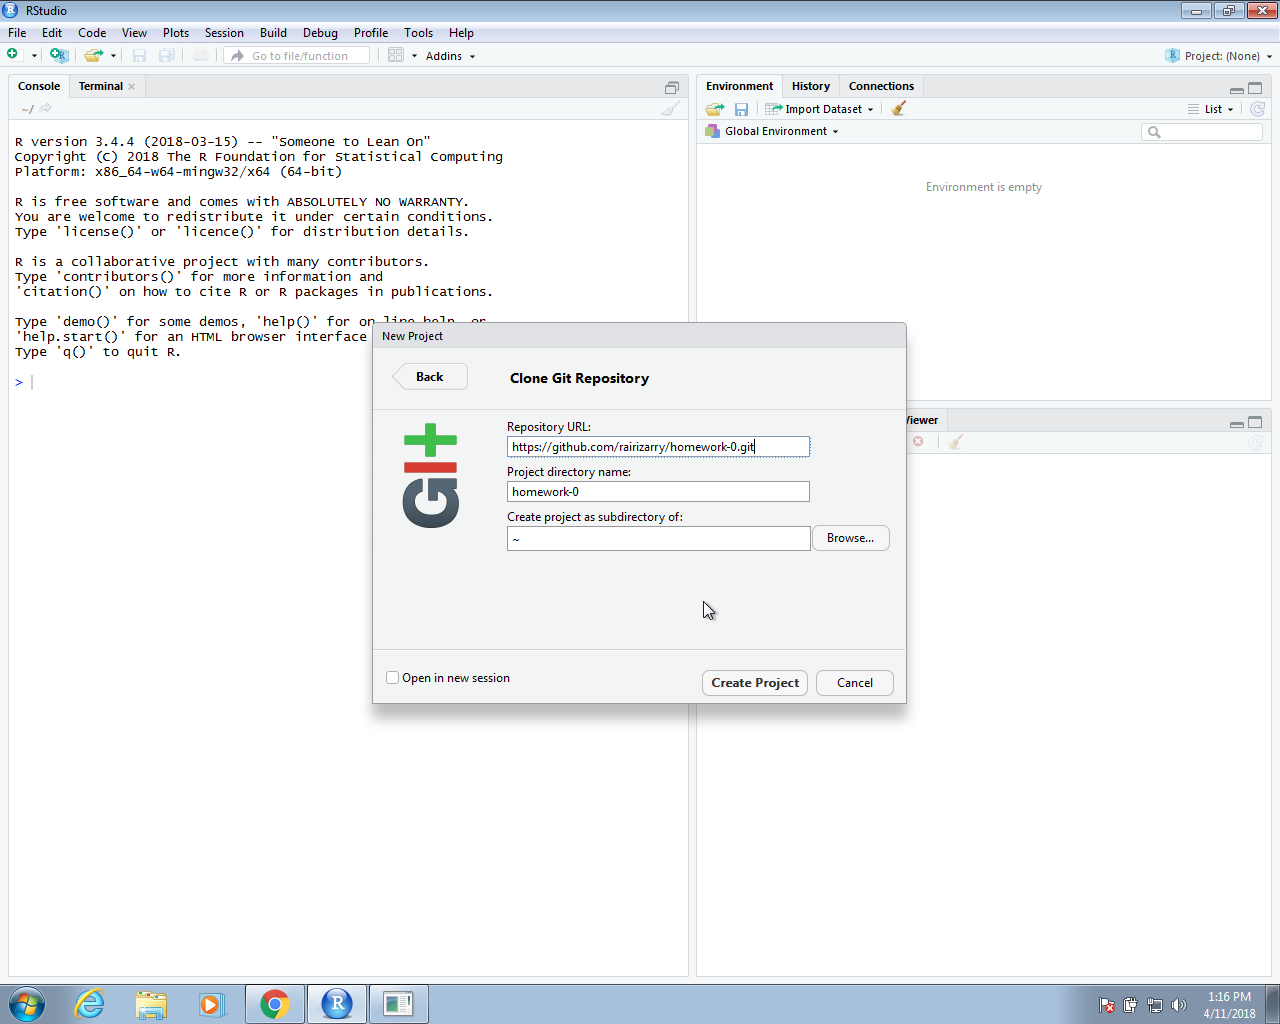
The repository URL is the link you used as origin or to clone. In Section 19.4, we used https://github.com/username/homework-0.git as an example. In the project directory name, you need to put the name of the folder that was generated, which in our example will be the name of the repo homework-0. This will create a folder called homework-0 on your local system. Note you will need to remove the folder if it already exists or chose a different name. Once you do this, the project is created and it is aware of the connection to a GitHub repo. You will see on the top right corner the name and type of project as well as a new tab on the upper right pane titled Git.
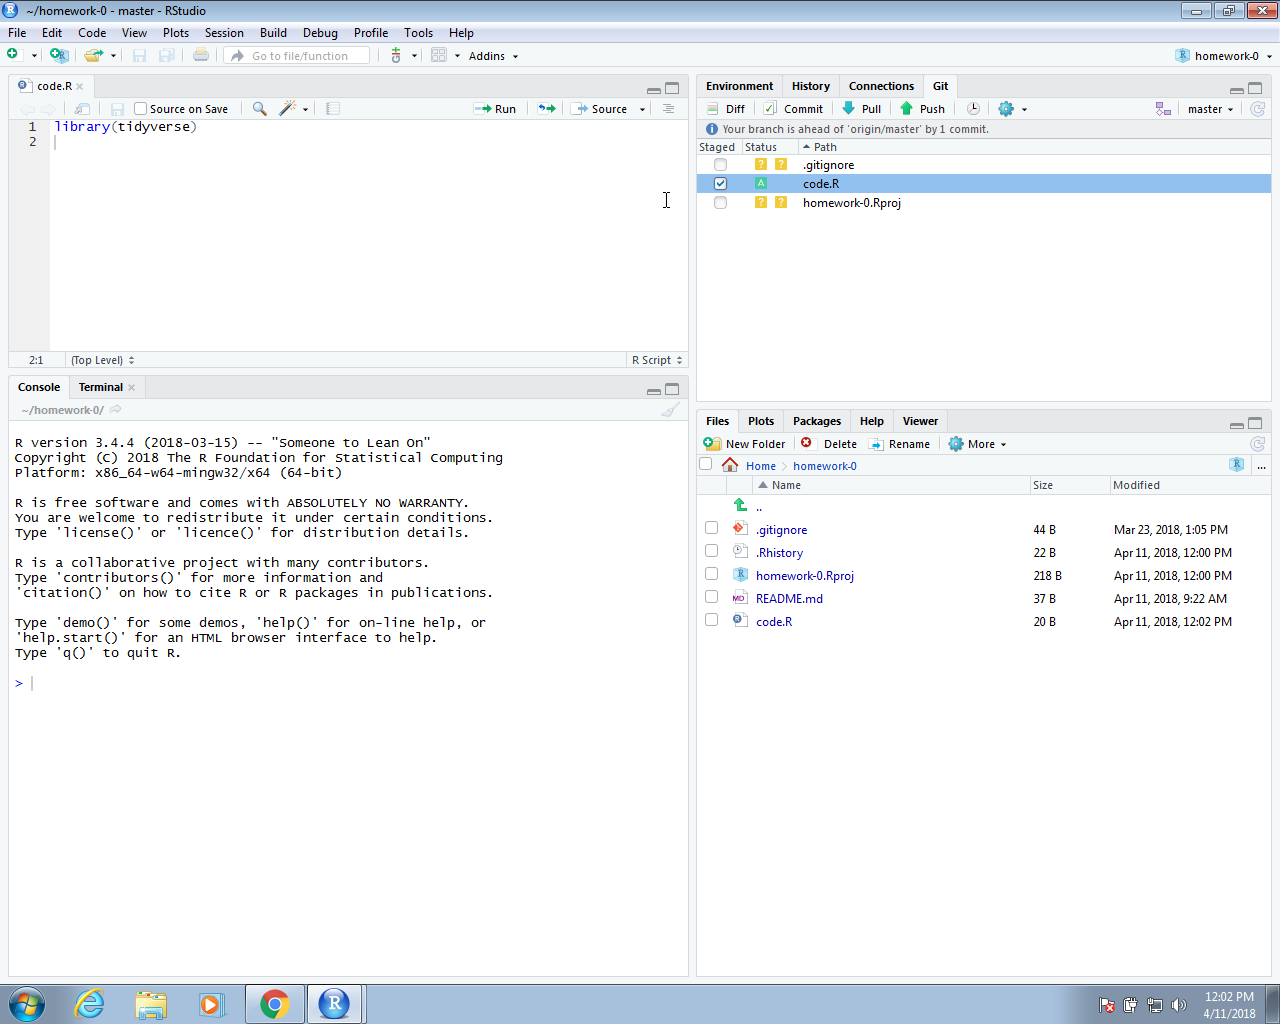
If you select this tab, it will show you the files in your project, excluding those in .gitignore, with some icons that give you information about these files and their relationship to the repo. In the example below, we already added a file to the folder, called code.R which you can see in the editing pane.

We now need to pay attention to the Git pane. It is important to know that your local files and the GitHub repo will not be synced automatically. As described in Section 19.2, you have to sync using git push when you are ready. We show how you can do this through RStudio rather than the terminal below.
Before we start working on a collaborative project, usually the first thing we do is pull in the changes from the remote repo, in our case the one on GitHub. However, for the example shown here, since we are starting with an empty repo and we are the only ones making changes, we don’t need to start by pulling.
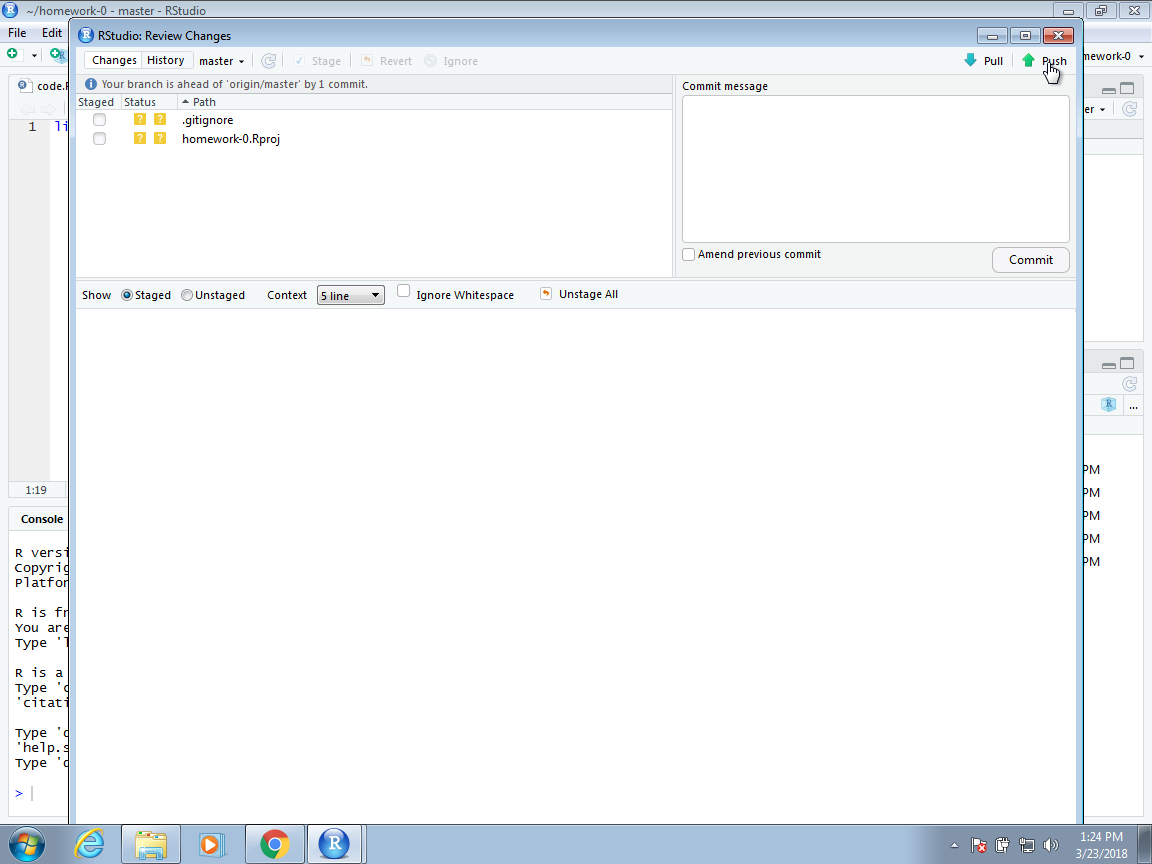
In RStudio, the status of the file as it relates to the remote and local repos are represented in the status symbols with colors. A yellow square means that Git knows nothing about this file. To sync with the GitHub repo, we need to add the file, then commit the change to our local Git repo, then push the change to the GitHub repo. Right now, the file is just on our computer. To add the file using RStudio, we click the Stage box. You will see that the status icon now changes to a green A.
Now we are ready to commit the file to our local repo. In RStudio, we can use the Commit button. This will open a new dialog window. With Git, whenever we commit a change, we are required to enter a message describing the changes being committed.
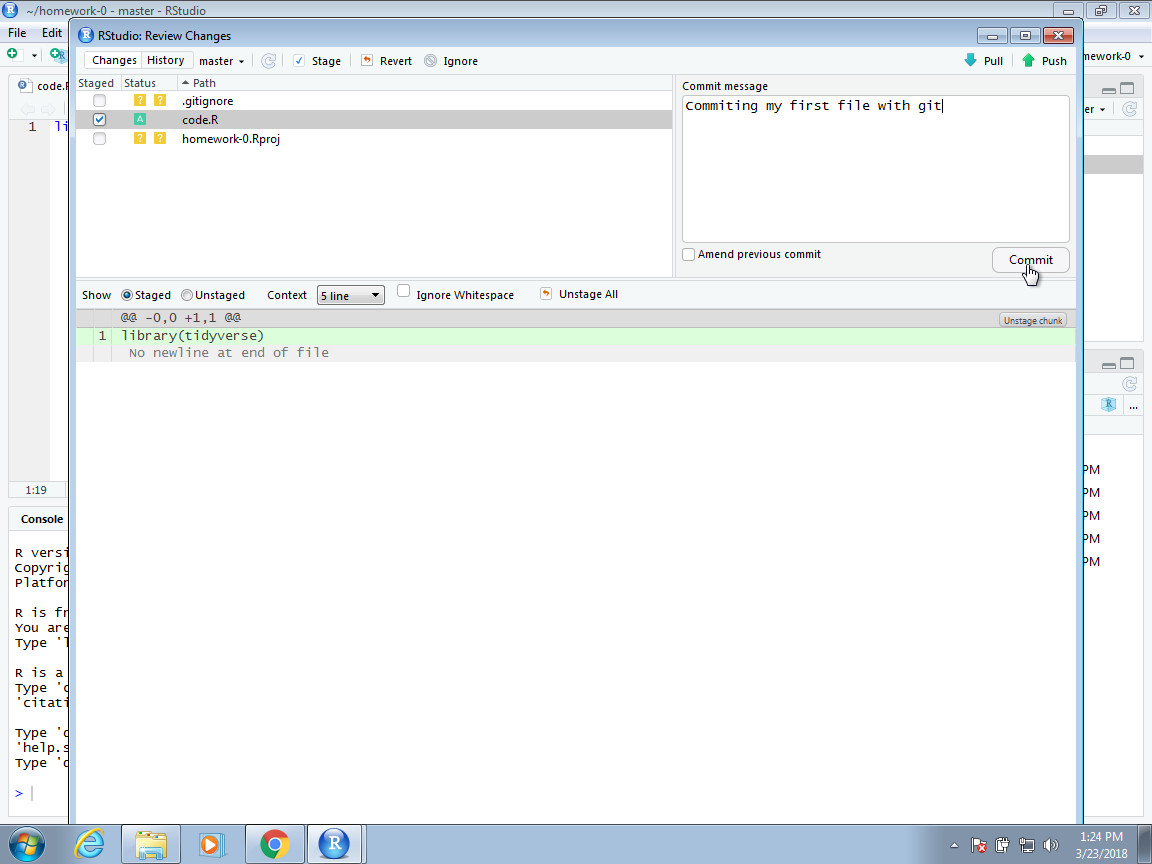
In this case, we will simply describe that we are adding a new script. In this dialog box, RStudio also gives you a summary of what you are changing to the GitHub repo. In this case, because it is a new file, the entire file is highlighted as green, which highlights the changes.
Once we hit the commit button, we should see a message from Git with a summary of the changes that were committed. Now we are ready to push these changes to the GitHub repo. We can do this by clicking on the Push button on the top right corner:
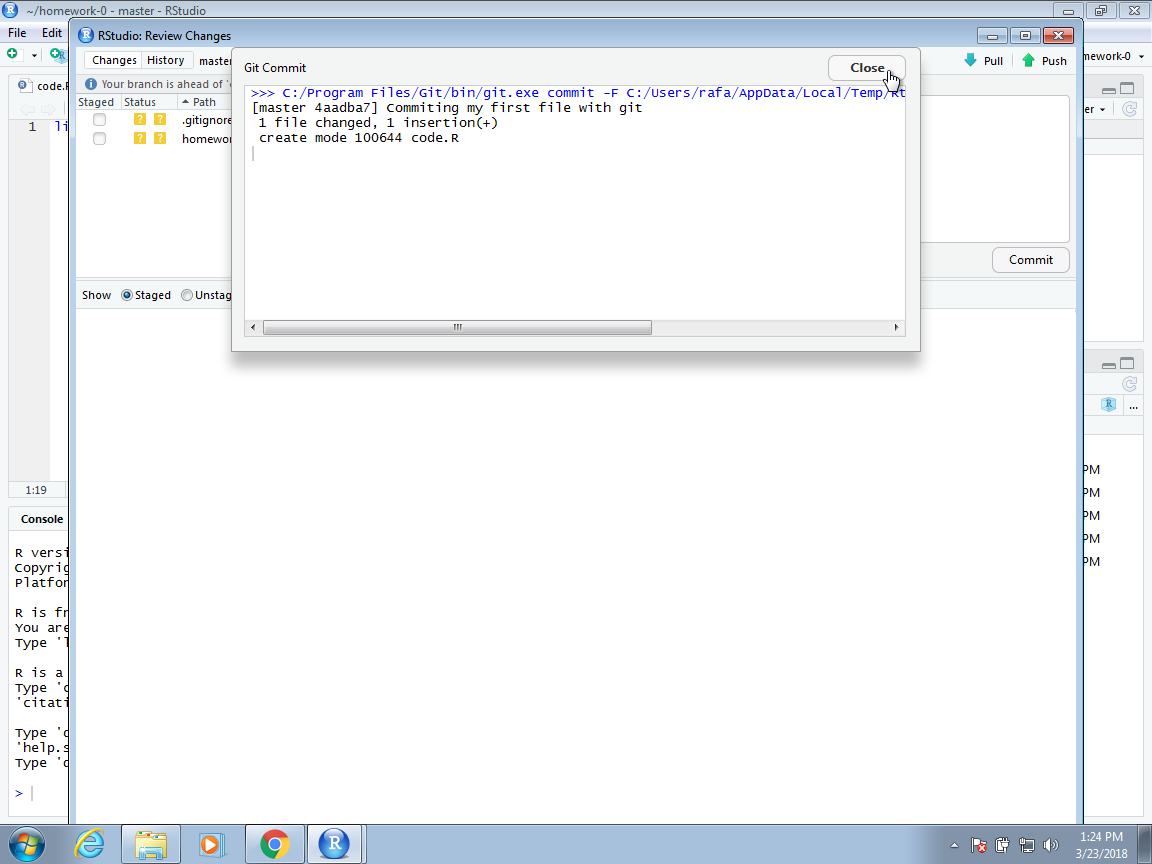
We now see a message from Git letting us know that the push has succeeded. In the pop-up window we no longer see the code.R file. This is because no new changes have been performed since we last pushed. We can exit this pop-up window now and continue working on our code.


If we now visit our repo on the web, we will see that it matches our local copy.
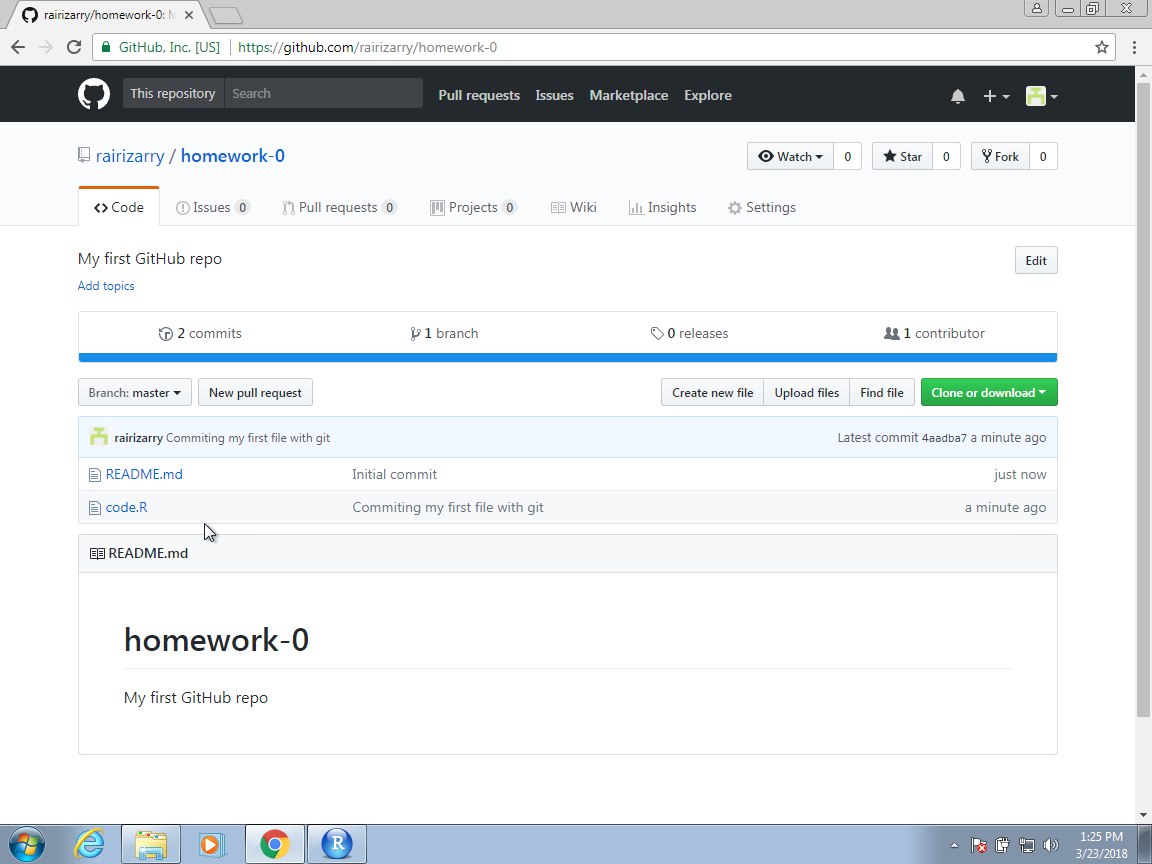
Congratulations, you have successfully shared code on a GitHub repository!
For the example shown here, we only added code.R. But, in general, for an RStudio project, we recommend adding a README.md file and both the .gitignore and .Rproj files.